|
|
|
|
This series of articles is aimed at the outright beginner and is designed to take the neophyte VB programmer from zero to intermediate, to the stage that s/he can navigate her way around the help files with some chance of understanding them! It is designed to give you a solid foundation on which to build your programming knowledge. It is far from definitive and omits much that is essential but, I feel, confusing. I am working on a further series of articles that will fill in many of the gaps but will be aimed at the more experienced programmer. In fact you, when you have finished this series! I start at the very beginning, so if you have already started to learn VB, you might find much that is obvious. You should read quickly through until you get to the stage that equals your level of expertise. I would however advise that you read it all. You never know what gems you might pick up along the way! I have tended to repeat my self with the bits and pieces that I consider important or a little difficult. You should make sure that you fully understand each section before moving on to the next I am sure that many experienced programmers will find some of the contents contentious and much of the code overly simplified. My intention is to provide the tyro with an understanding of programming, this often involves ‘Puff Puffs’ rather than ‘4-6-2 Saddle Tank Locomotives’ In places I may have omitted some important fundamental information in the belief that too much of a good thing is too much of a good thing! Any omissions will be made good further on in the series. It is subject to change and side tracks all the way through, bear with me, I am doing it for fun and don’t expect to make a profit! I would appreciate feedback in the form of constructive criticism to: [email protected] Tony Vincent. New Zealand. 1999. Part One Loading a programming, naming the forms and setting up the folders When you first load VB you will see the New Project screen
on which you will be given the choice of which type of Project to load. You should choose Standard. Having chosen Standard you will get a screen, which consists
of a whole bunch of windows. There will be some variation
between the different flavours of VB but the Opening
screen should look something similar to this:- On the left is a tool box. It contains 'Controls'. These are the building blocks of the program/user interface. The Standard Project gives you a selection of the 20 most commonly used controls. There are Text Boxes, Picture Boxes, Labels, Timer Controls etc. etc. Most times this is all you will need. Other controls can be added if and when you need them. They are all called 'Controls' (Officially they are called Windows but this can lead to some confusion so I will stick to ‘controls’) Having chosen to load VB with the Standard controls you will have a work area in the centre of the screen that will contain a FORM called 'Form1' This is the Face or 'GUI' of your program. This is what the
user will see when s/he runs the program. At the moment, before we add
any controls, it is blank On the top right you have the Project Tree. This will show all the FORMS and MODULES that you have in your program. At the moment there is only one FORM. You may have as many Forms as you need but each Form must have a different name. There is a convention for naming Controls, Forms and Modules which you would be advised to follow. It involves the use of a three letter prefix. The convention for Forms is to prefix the Name of the form with lower case ‘frm’ followed by the (descriptive) name of the Form. I always name the first (usually main) form:- ‘frmMain’ As a beginner you will be unlikely to have more than two or
three forms in your early programs but it is not uncommon to have many, many
more. It might help you to think of each of these forms as a
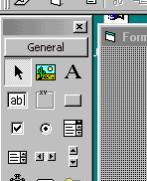
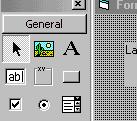
different page of your program. On the bottom right of the opening screen is the 'Properties Box' This shows the 'Properties' of the Controls and Forms. Properties are fundamental to VB programming and you will need to take some time to understand the concept fully. A Control, a text box or label etc. is an ‘Object’ that carries with it a set of ‘Properties’ The ‘Label’ control is denoted by the letter 'A' . Its default 'Name Property' is ‘Label1’
You can move it around at will, in the design stage, by Left Click Dragging it. While the 'Label1' has the focus it's Properties are displayed in the Properties Box at the bottom right. This shows the 'Caption' Property of the Label, which is, by default, the same as its name but should be changed to show the desired message. To see the Properties of the Form or any control that you have, you simply give that control focus. The primary use of a Label is to display static text but it is surprisingly versatile and can be use for many other purposes. Each of the Properties of a Control can be set at design time and many of them can be changed at ‘Run’ time By default the ‘Border’ Property of the Label is set at zero, or None, which means, of course, that the label has no border at run time. At the top of the Programming Enviroment you will see a series of Menus and buttons. To test run your program you can click on the small blue triangle. You will see the form displayed with the Label.Caption ‘Label1’ To end your program you can click the usual Widows exit cross or you can use the small square on the menu bar. The Form itself is a ‘Control’ and has properties of its own, which can be set to determine how the form will present to the user. OK. You know how to place a Label on a Form. Now you should select a Command Button from the tool box:-
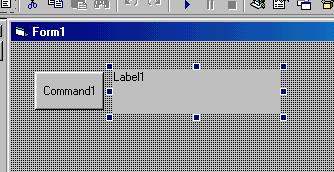
and put it along side of the label. You have created your first GUI (Graphical User Interface)! This is the program that the user will see when s/he runs your application. What we need to do now is make the program do something. Traditionally the first program that most people write is the ‘Hello World’ program. And this is what we will do. VB is what is called ‘Event Driven’. This means that the application just sits there doing nothing until the user does something first, it is waiting for an ‘Event’ to trigger some reaction. This might be the press of a button or a key, or it might be responding to an internal event like the system time or an incoming telephone call. To create a Command Button Event we need to write some code in the ‘Command Button Even Procedure’ Sounds complex! Its not, it is very simple. Double click on the button that you have placed on the form. You should now have a screen like this:- This is the Command Buttons ‘Click Event Procedure’ It helps to think of this code area as the back of the form. Any code that you put between the line ‘Private Sub Command1_Click()’ and the ‘End Sub’ will be enacted when you ‘Click’ the button. What we want the program to do is print the words “Hello World” on the label. The code to do this is as follows:- Label1.Caption = "Hello World" You are telling the Label1 Caption Property to equal
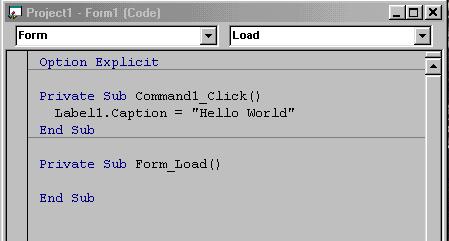
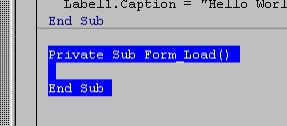
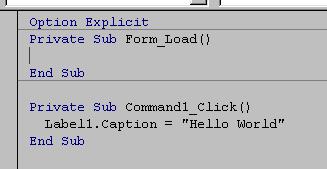
"Hello World" The Command1_Click event now looks like this:- Private Sub Command1_Click() Label1.Caption = "Hello World" End Sub If a line of text, figures or symbles or any combination of them is put between the inverted commas it is treated as a ‘String’ and is reproduced exactly as it is shown Add the code and run the program and see if it works ok. Congratulations you have just written your first program! As mentioned, a Form is a control like any other and has its own Properties. When the program first loads it checks in the Form 'Load Event' to see it there is any code there that it must enact before showing the GUI . If you double click on the face of the form you will see ‘Form1_Load Event Procedure’ as follows:- As you can see it is under the Command1_Click event It is a good idea to organise the procedures, as far as possible in the order that they are likely to be enacted by the program. The reason for this is that it is much easier to navigate your way around the code on the form if you have it in a consistent order that is followed in all your applications. Remember that you might have a thousand lines of code and comments to hunt through! It is very easy to get lost. For this reason I always put the Form_Load event as the first procedure on the form. You can move blocks of code by placing the mouse curser at the left of the code block and while holding the left button down move the pointer down until the code block is highlighted:-
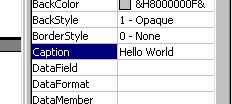
Now left click on the highlighted area and while holding the button down move the block to the top of the form code page:- Highlight code line ‘Label1.Caption = “Hello World” and move it to the Form_Load event procedure. Now when you run the program the words “Hello World” will appear on the label. Finally, there is an easier way to have the words appear on the label at start up and that is to enter them in the Labels Caption Property in the properties box at the right of the screen:- You will need to explore the different abilities of the properties of the controls for yourself as there are far to many of them for me to explain them all. We will meet many more of them in the course of this series and I will explain those that are a little more complex when the time comes. To finish this Hello World program I will introduce a little bit of serious code. The vast majority of programs need input from the user. It needs to test that input to determine what action to take, so we must have code to do that test. The number and complexity of the choices it has to make will determine what code we should use. In the case of the ‘Hello World’ program there will be only two choices so we will use the:- ‘If…Then…else…End If’ loop It is a good idea to enter your code in lower case, if the code is correct it will automatically upper case itself. The If..Then loop takes a condition and tests it. The condition we will test is the caption property of Label1. We will use the Command1_Click event to initiate the test.
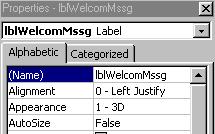
This is a good point to introduce ‘P Code’ or Algorithms P Code stands for Pseudo Code. It is a simple, plain English description of what you expect your code to do . P Code for this program would be:- 1) Test the Label1.Caption Property 2) If it is ‘Hello World’ then change it to ‘Goodbye World’ 3) If it is ‘Goodbye World’ then change it to ‘Hello World’ Pretty exciting huh? ‘’’’’’’’’’’’’’’’Code Stars Here’’’’’’’’’’’’’’’’’’’’’ Private Sub Command1_Click() If Label1.Caption = "Hello World" Then Label1.Caption = "Goodbye World" Else Label1.Caption = "Hello World" End If End Sub ‘’’’’’’’’’’’’’’’’Code Ends Here’’’’’’’’’’’’’’’’’’’’ If we match the P-Code to the actual code we will see:- 1) Test the Label1.Caption Property If Label1.Caption = "Hello World" Then 2) If it is ‘Hello World’ then change it to ‘Goodbye World’ Label1.Caption = "Goodbye World" 3) If it is ‘Goodbye World’ then change it to ‘Hello World’ Else Label1.Caption = "Goodbye World" End If Type the code into your program and run the application. This type of ‘Test of a condition’ is fundamental to all programming and you will need to have a complete understanding of how it works. I guess that is enough of that somewhat silly program for now and I will move onto more serious things, but first some advice on naming conventions and saving your applications. Your application will eventually consist of a number of Forms and Modules (more on Modules later) and it is important to organise them in a logical manner. The naming convention for Forms is to prefix the form name with ‘frm’ I always name the main form of my applications as ‘frmMain’ and will do so throughout this series of articles. To name a form you enter the name you have chosen in the Name Property of the Form:- Simple as that! You should also rename the Project to reflect the nature of the application. We will rename this project ‘HelloWorld’ (Note no spaces!) We do that by clicking on the existing name
and entering the new name here. Now we need to save the project. I have a convention for this as well.! I have just made a quick count and as of this moment I have 26 applications in my ‘Work in Progress’ folder. All of these are either just finished and waiting for bug reports or currently being worked on. It is very important to keep organised!! Each program that you build will, during the design stage, consists of a number of files. There will be a Project file which, when saving should be given the name of the program, for instance 'HelloWorld' There will be at the very least four files and almost certainly a lot more. Another quick count of a medium sized app. shows thirty-four files! The files will be of different types but they can be broken into four distinct groups;- Forms Modules Data Project When you save your project you should have a main folder, mine is called WIP (Work in Progress) that will contain all your projects. In this you should create a folder to contain each project, named for the project that it contains, in this case ‘Hello World’ In this folder you should create three more folders called:- Forms In which you save the Forms Bas To save the .BAS Modules Data To save the data files, eg. Database files This is a view of one such set of folders for a game called Pentameters:- Now we are ready to start to program! But first a few boring bits!!! One of the main concepts of programming is the use of Variables. A Variable is a name that represents some value in our program. It is analogous to the X in an algebraic equation. We know that there will be a value but we don’t know what it will be yet. We have to refer to it so we refer to the name that we have given it. This name is a variable. Visual Basic reserves an area of memory to store the value that we award our variables. To let VB know how much area to allow we must 'Dimension and Declare' our variables in the appropriate place. We do this all at once with the code line:- Dim 'VariableName' as 'Type' 'Dim' is an abbreviation of the word Dimension. 'VariableName' is the name that we have chosen for our variable 'Type' is the Type of value that will be held in the variable. VB gives us a large selection of Types to choose from. At the moment we will deal only with the most common. String and Integer A String is a line of text or alphanumeric symbols. A String is the actual letters and symbols not their value! “Hello World” is a String “1234567890ABC” is a String “3 + 4 = 7” is a String A String is always written enclosed within double parenthesis (quotes) “” An 'Integer' is a number value ranging from negative -32,768 to 32,767 An Integer is different from a String in that it stores the actual value of the number that are awarded it. For example, if you tried to join the values held in two Strings as follows: Dim NumberOne as String Dim NumberTwo as String NumberOne = “3” NumberTwo = “4” Print NumberOne + NumberTwo you would get the answer: 34 The two Strings have been 'concatenated' (joined end to end)) If on the other hand you declared them as Integers as follows:- Dim NumberOne as Integer Dim NumberTwo as Integer NumberOne = “3” NumberTwo = “4” Print NumberOne + NumberTwo you would get the answer: 7 the two values 3 and 4 would be 'added' together and the result printed to screen. We usually use the plus sign:- '+' to ADD values and the AMPERSAND sign:- '&' to concatenate strings. OK armed with these few facts we will start to build our next program. Most if not all applications, no matter what they are designed to do, will gather information, process it and return a value, either to the user and or to another part of the application. What we will do is write a small application to get the users name and print a personalised message to her. The P code or algorithm for this simple program would be as follows 1) Print welcome message 2) Get Users Name 3) Add Users name to message 4) Print new message to the screen incorporating users name. As you can see, this simple algorithm clarifies the steps needed to write the program. OK we will write the program. 1) Print welcome message 2) Get Users Name There is an established formulae for naming controls that uses an abbreviation of the controls name as a three letter prefix to a description of its purpose. For example the label controls prefix is ‘lbl’ Its purpose in this case is to display the message so I will rename it:- lblWelcomMssg Put a label on the form. Set the label properties as follows:- Name = lblWelcomMssg Font = size 12 Double click on the face of the form and you will switch to the Form_Load event . In here put the following code:- Private Sub Form_Load() Dim sMssgPartOne As String Dim sMssgPartTwo As String sMssgPartOne = "Hello" sMssgPartTwo = "What is your name?" lblWelcomMssg.Caption = sMssgPartOne & " " & sMssgPartTwo End Sub Notice the indentation and spacing of the code. Each line is indented (spaced from the left) according to its ‘level’ (how ‘deep’ it is from the surface) Each ‘Code Block’ is spaced horizontally into its own block. (Related lines of code) Broken down line by line this code means:- In the Form Load event Dimension two Variables called sMssgPartOne and sMssgPartTwo as Variable Types String The prefix small 's' indicates that it is a string, a good reminder throughout the program. Private Sub Form_Load() Dim sMssgPartOne As String Dim sMssgPartTwo As String sMssgPartOne = "Hello" sMssgPartTwo = "What is your name?" ' Make those variables equal the string values “Hello” and “What is your name” lblWelcomMssg.Caption = sMssgPartOne & " " & sMssgPartTwo 'This line of code concatenates (joins end to end) the two values that are held in ' the two variables and also puts a string value, a space (“ “) between them. ' The concatenation is coded with the ampersand sign ‘&’ which means ‘and join’ ' The concatenated result is:- “Hello What is your name” ' This is put into the Caption Property of the label, lblWelcomMssg and ' displayed when the application is run. End Sub This is the closure code line for the Form_Load event You should be building this program as you read and should run it every time that you make an addition or change to the code. If it runs as you expected then you should save it and continue. If not, change the code, find the mistake, alter it and run again until you are satisfied that it does what you want. When VB compiles it ignores any comments or white space so you need not worry about saving space by economising on these features!! USE PLENTY OF COMMENTS!! The application asks for the users name so we need to put somewhere for her to enter her name. For this we will use a Text Box. The Text Box is the control with the letters 'ab' written in it. Left click on the control and draw it on the frmMain, making it big enough for the users name. Set the text box properties to:- Name = txtName Allignment = Center Font = 12 Text = Leave blank Now when the program is run the user can enter her name in the text box. We need to decide what prompts the final message to be displayed. We can use a Command Button control for this. Load a Command Button control onto the form and set its Properties to:- Name = cmdOK Cap Caption = &OK Note: The & underlines the letter following it and creates an alt/? Shortcut Ena Enabled = False Now when you run the program you will see that the button is not available for use. This is because, as there is nothing yet entered in the text box, we have chosen to prevent the user from pressing it. It is a simple form of error trapping. We need to enable the button once the text box has a value entered into it We can do this in a number of ways. I have chosen to do it as soon as something is entered in the text box using the Text Box 'Change Event' If you double click on the text box you will switch to the Sub txtName_Change In here you want to put the code to enable the OK Button. You do this with the code line:- Private Sub txtName_Change() cmdOK.Enabled = True End Sub Now as soon as you enter anything in the text box the OK button will become available for use. 3) Add Users name to message 4) Print new message to the screen incorporating users name. We have chosen to make the OK button the trigger to display the final welcome message so we need to put the name that we have obtained in the text box and concatenate it to the existing message contained in the variable ‘sMssgPartOne’ Double click on the OK button and in the Click event sub put the code block:-
Private Sub cmdOK_Click() Dim sUserName As String sUserName = txtName.Text lblWelcomeMssg.Caption = sMssgPartOne & " " & sUserName End Sub Now try to run the program ……… And you will get an error message! Compile Error. Variable not Defined. You will see the Variable ‘sMssgPartOne’ HighLighted. But what is going on? We know that we Dimensioned that variable in the Form Load Event! Why is it not Dimensioned now? To understand this we need to go a little more deeply into the procedure for Declaring the Variable. Declaration
of Variables at Procedure, Public and Private Module level There are a number of ways that we can declare the variable. I will describe two of them. Local within the Procedure. We did this with the code line 'Dim sMssgPartOne As
String' in the Form Load event procedure of our program. The Variable is Dim'ed
between the lines 'Private Sub Form_Load()' and
'End Sub' This means that the value in the variable only exists while it is used within that procedure. As soon as we go outside that procedure and into another as we did with the cmdOK_Click event we lose whatever value we had in the variable. Private at Module level. This means that the value that we have put into the Variable will be available to all the Procedurres that are in that Module To make our application work properly we need to change the Declaration of the Variable sMssgPartOne from a Procedure level Declaration to a private level Declaration. We do this by deleting the code line in the Form Load declaration Option Explicit Private sMssgPartOne as String. Private Sub Form_Load() Finally we need to compile the program to make an .EXE file of it. Click on the File menu at the top of the VB enviroment screen and select Make 'Project1.EXE' You will be given a choice of path and file name and that is all there is to it! OK We have covered a lot of ground and I would be surprised if you do not have a few queries. If you would like any help on what we have covered so far please feel to mail me at [email protected] Home Top of Page |
Send mail to [email protected] with
questions or comments about this web site.
|